
Stitches: The Nuts & Bolts of Sewing
Stitches hold fabric together to form a useful garment just as nails, screws and bolts attach boards and planks to frame a dwelling. In some instances, a nail is sufficient; in others, heavy bolts are required to withstand the stresses of long-term use. The same is true with the hand-sewing of an 18th-century garment such as a trade shirt: a hem stitch might keep the shirt’s lower edge from unraveling, but the constant pull and tug on a shoulder seam requires a fine back stitch.
The complexity of a given project, coupled with the garment’s intended use and the historical stitch choices of the original tailor or seamstress, often dictates the type of stitch needed. Relying on one or maybe two stitch types is a common pitfall of newcomers to sewing. For example, hand sewing an entire trade shirt with a running stitch produces a finished product that looks good, but the wilderness classroom soon teaches the folly of that practice, just as nailing an entire house with 8d common nails spells future disaster.
Single or Double Thread?
 Most needles are pretty easy to thread, and the process is self-explanatory. What is often overlooked is whether to use a single strand of the chosen thread or to double the strand. As a general rule, the majority of fabric sewing, say for a trade shirt, is done with two strands of thread (Fig. A): a single strand threaded through the needle’s eye, doubled on itself and then the loose ends knotted.
Stitches in leather are usually made using a single strand of thread (Fig. B): a single thread is threaded through the needle’s eye with a three to six inch tail that is gripped in the palm of the sewing hand, which prevents the thread from being pulled back through the needle’s eye. The thread’s end might be knotted before sewing begins, or the end might remain loose for knotting later. And in the case of the saddle stitch, a second needle is added to the loose end.
Here again, the project, the stitch type, the stitch location, the expected seam stress and the original maker’s choice often determine whether a single or double thread strand is used. For example, stitching up a 90-pound canvas pack of trade goods using stout cord and a six-inch needle is usually done with a single strand, while an 18th-century seamstress might have hemmed a silk scarf with a double strand of the finest silk thread.
Securing the Thread
When observing and studying a period artifact, either in person or through photographs, I like to pay close attention to how and where the sewing begins. But in many instances, it is difficult determining where the stitching starts or where it ends, which is a reflection on the skill of the seamstress or tailor. Rarely does one see a big, clumpy knot. Therefore, when I begin to sew, my first consideration is not only adequately securing the thread, but also making the point of beginning, or end, as invisible as possible.
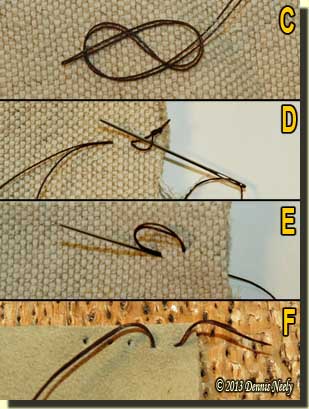 There is a special “tailor’s knot,” which is made by twisting the double strand thread ends between the thumb and fore finger, but I have never been able to master it. For most fabric hand sewing, I form a “figure eight” when I make my knot (Fig. C), rather than a common “overhand” knot, which sometimes pulls loose when I tighten the first few stitches. After knotting, the thread is pulled over the edge of a hunk of beeswax, which minimizes twisting, keeps the strands together and lubricates the thread.
Taking the seam style into account, my preference is to secure the thread to the piece of fabric the needle will first pass through so when the seam is turned the knot and anchor point will be concealed. I count about four warp or weft threads, pass the needle under those threads, pull the thread through, slip the needle through the knotted loop at the end of the doubled thread (Fig. D) and pull it tight. Pulling too tight will break one of the threads.
Aligning the fabric pieces, I often start with a single “lock stitch,” created by passing the needle through the fabric layers to the left side, counting four or so threads, passing the needle back through the layers to the right side, then using the same hole, the needle is again passed to the left side (Fig. E). In essence, the thread forms a complete loop that pulls all layers together, and from there I begin with my first stitch.
For single strand thread, I usually start with the same lock stitch. In leather, I punch two holes close together, pass the thread through the first hole to the left side, pass it back to the right side and then tie the tail to the main thread. On some projects I leave enough tail to thread a needle (Fig. F), and once the seam is sewn, I work this tail back through the first few stitches to secure it and then I clip off the excess.
Seam Allowance and Stitch Count
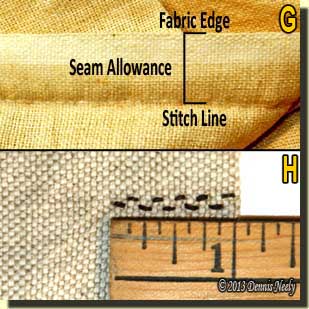
Once the thread is anchored, or held in place by my finger if I leave a tail to tie off later, I begin my first stitch close to the place where I secured the thread. Most seams are sewn in a straight line. For curved seams the stitching remains a uniform distance from the edge of the fabric or leather. This distance, from the stitch line to the fabric edge, is called the seam allowance (Fig. G), and varies from garment to garment, but the “extra material” for the seam allowance must be accounted for when cutting the fabric.
 Patterns or sewing instructions often specify the seam allowance used, which is include in the pattern piece and often shown as a dotted line. For hand-sewing a trade shirt, I like to work with a 3/8 inch seam allowance, but when machine sewing, the common seam allowance is a uniform 5/8 inch. Sometimes a pattern will specify a smaller seam allowance, as in the case of a shirt’s cuffs or collar.
In general, the closer the stitches, the greater the strength, thus seams are spoken of in terms of stitches per inch: the higher the number, the smaller the stitches and the stronger the seam is. An average stitch count (Fig. H), or stitches per inch, for a back stitch in fabric, as an example, can vary from four to twelve, depending on the seam location, purpose and the individual’s skill level, with eight being an average.
For durability and esthetics, many seams are made with the idea that they will remain hidden within the garment. Therefore a tailor or seamstress needs to think a bit about what he or she is doing, perhaps pinning a sample seam to make sure of the end result. This is important, because it determines how the fabric faces are positioned while the seam is sewn. For hidden seams, the right sides of the fabric are usually placed together while the seam is stitched together. After the seam is sewn, the garment is turned right side out, positioning the stitching and seam allowance on the inside of the garment.
Give hand-sewing a try, be safe and may God bless you.
