Considering the Options
On the one hand, Major Andrew Foster’s split pouch appears somewhat ornate, but on the other, there is no question it was used. The deer hair in the tin cones is broken at the cones’ edges, the quill work is damaged or missing in places, and there appears to be some staining and discoloration of the deerskin (assuming that is the type of “hide” used for the pouch). Perhaps the original owner inflicted the wear and tear, or Foster himself might have. Either way, there is probably a wonderful story or stories involved with each affliction, stories we will never know.
Undertaking a complete, museum-quality reproduction of the original Foster split pouch is beyond my skill level, especially when it comes to the quill work. Hiring someone to make a perfect copy is beyond my financial means, as well. In addition, making the appropriate arrangements, taking the travel time, the cost of airfare and lodging, etc. to gather firsthand knowledge and images of this artifact is also prohibitive.
But, I have never allowed such restrictions to stand in the way of any traditional black powder hunting opportunity. In the end, I am left with approximating as close as possible this split pouch, based on the museum photo posted online—that is not optimal, but it is the only choice. In such circumstances, I try to remind myself that a one-hundred percent re-creation of the 1790s and the environment that existed along the headwaters of the River Raisin is a physical impossibility, too. The best I can hope for is “coming close.”
Establishing “What You Know”
Clarence Moore was one of my high school math teachers. Early on, Mr. Moore said the secret to solving any story problem was to “establish what you know.” That sage advice has stuck with me all these years, and I find it especially helpful when planning a project based on an original artifact.
So what do I know? First, the Foster split pouch was gathered either at Fort Miami or at Fort Michilimackinac, sometime prior to 1795, the date given when the British Major shipped back to England. The pouch was made by one of the Great Lakes tribes, but the exact band remains undetermined.
The museum description lists the materials used as “Hide, metal cones, dye/dyes, hide thong/babiche, deer hair, sinew” (NAMI, catalog number 24/2016). Reviewing other split pouches, I settled on deerskin as my “hide” choice.
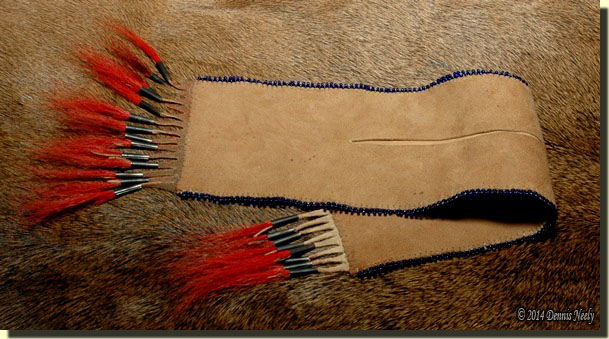
The general construction is two long rectangles, laid flat against each other. One of the rectangles has a lengthwise slit cut along the center line. Even after enlarging the image, the actual method of joining the long edges is hidden by the quill work. It appeared that the “metal” cones on each end are attached to hide fringe cut from a single piece of leather sandwiched between the front and back like a gusset. Faint lines suggest the ends were closed using a whip stitch, but that presents a sewing problem, which will be addressed in the step-by-step instructions.
 Because I have never used a split pouch, I wanted to keep this one simple and plain with a minimum of ornamentation. Other artifacts from the late 18th century attributed to the Ojibwe or Odawa show side seams with beadwork, what some folks call “two-bead edging,” because two beads are added at a time. I have also heard this referred to as “bead-lace edging.”
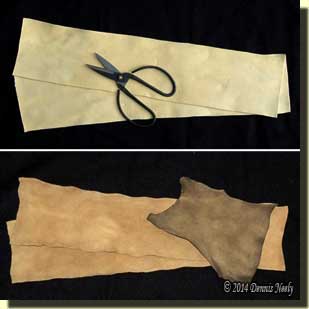
The description also states the size as “43 x 9.5 cm” (17.2 by 3.8 inches), but fails to mention if this includes the deer-hair cones. The Iroquois pouch in “Bo’jou Neejee!” is listed as “L. w/o fringe 45.5 cm” (18.2 inches) (Brasser, 62), and the Ojibwa pouch, although it is of a different shape, is 46 cm (18.4 inches) (ibid, 71). Rummaging through my leather bin, I found a cutting of commercial brain-tanned buckskin with enough material to cut two pieces 3 5/8 by 16 ½ inches, which is close to the size of the Foster split pouch.
Making the Split Pouch
I realize that most artisans will dye the entire piece and then cut out the parts, but I cut the buckskin lengthwise and laid the two halves together. I did this so I could visualize the finished pouch, thinking through and planning each step. I find this method works best for me, because it often brings to light problems that I might not anticipate until it is too late.
 It was during this time that I figured out how to do the deer-cone fringe on each end. With that problem solved, I looked for a suitable cutting to make the fringe. I found a piece of buckskin already dyed in walnut hulls that was the right size.
From the start, I wanted to experiment with dying the leather in a dye bath made from stag horn sumac berries. I thought the walnut-dyed fringe pieces would blend with pouch, so I set that piece aside and put the two sides in the sumac dye bath. I stirred the bath twice a day. After a week I rinsed the leather and set it in the shade to dry. Once dry, I worked the leather, then trimmed and squared both pieces to their final size.
 Cutting the hand slit was the next step. From a printed copy of the Foster split pouch image, I measured the split length and divided it by the pouch’s overall length in inches, which amounted to 40-percent of the length. I folded one side in half widthwise, then in half again lengthwise. I punched a small hole where the folds intersected with an awl: the center of the pouch (A). With the side laid open again, I punched a hole along the lengthwise fold 3 1/4 inches either side of the center mark (B & C), marking out a slit that was 6 1/2 inches.
After cutting the slit, the pouch looked correct compared to the printed copy, but not knowing how I would be using the pouch, I tried to slip my right hand through the slit. My knuckles did not fit. I sputtered for a while, then decided to cut each end of the opening another 1/2 inch. In hindsight this may have been a mistake.
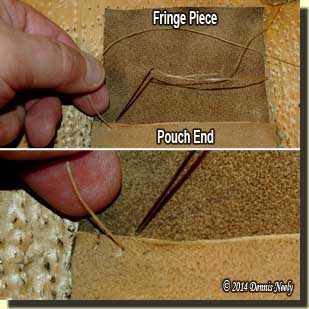 Turning my attention to the walnut-dyed deerskin, I cut fringe pieces the same width as the pouch sides, 3 5/8 inches, by about 3 inches long. With a fringe piece sandwiched between the two pouch ends, I started punching holes for the whip stitching through all three layers.
Because the fringe piece was solid, I needed a hole for the artificial sinew (the original pouch was sewn with sinew) to pass through to complete the stitch. Halfway between the holes punched in the pouch end and right tight to the pouch leather, I punched a clearance a hole.
I split a standard strand of sinew into thirds, threaded a tapestry needle and began sewing the pouch end closed. Part way across the end, I realized the stitching looked very close to that on the end of the Foster pouch. After tying the thread off and working the tail back through the stitching where it wouldn’t be seen, I cut the strand and started sewing the other end closed.
In place of the quill work at each side seam, I decided to use cobalt blue 8/0 glass beads. The stitching that holds the beads in place also holds the pouch sides together, plus the beads act as a protection for what would be exposed stitches on the sides.
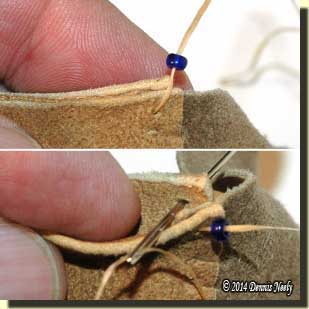 Starting the beading run can be tricky and a bit confusing, and there is more than one way to begin. With the sinew knotted on the inside of the pouch, I used a tapestry needle to pull the thread to the outside.
I removed the needle, threaded on a single bead and re-threaded the needle. Some craftspeople like to use a thin beading needle with finer thread, but I am after strength and durability so I find it best to use thicker strands and hand-thread the beads.
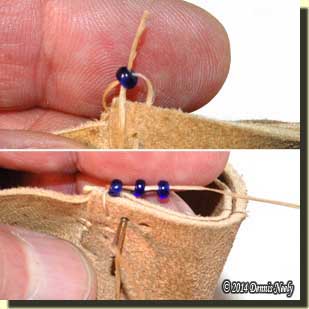
Next, I passed the needle from the inside of the second pouch side to the outside, removed the needle, ran the strand up through the first bead and snugged the strand, anchoring the first bead.
I threaded two beads on the strand (thus the name: “two-bead edging”), added the needle and passed the needle through the outside of one side, through both layers and back out the other side—outside to outside.
After removing the needle, I then threaded the sinew strand through the last bead, running the end toward the second bead and snugged the sinew, finishing the first two-bead stitch. The last bead on the strand should lie “flat” against the pouch sides, and the next to last bead should “stand up.”
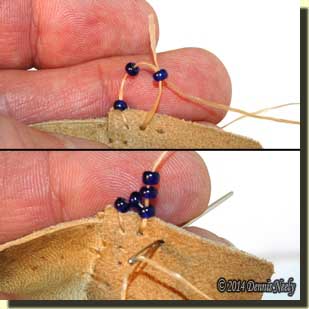 To complete the third stitch, two more beads are added, then the needle. The stitch is made outside to outside through both layers and the end of the sinew strand is again threaded through the last bead toward the second-to-last bead and snugged up. After securing about six pairs of beads, the stitching develops a rhythm, which produces an even beaded edge while securing the two sides with straight, uniform stitches.
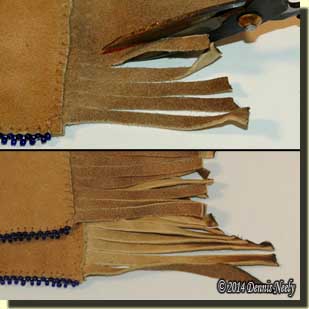
After both seams were completed, I used the awl and a straight edge to divide the first fringe end into quarter inch strips, similar in width to those used for the Foster split pouch. When cutting the fringe, I tried to be careful with the scissors so I didn’t inadvertently snip one of the whip stitches on the pouch end.
It looked like the fringes on the Foster split pouch were trimmed narrower, so I next tapered each quarter-inch-wide fringe strip to about an eighth-inch wide with the scissors. Running the resulting thong through my thumb and forefinger stretched and tightened the buckskin’s fibers.
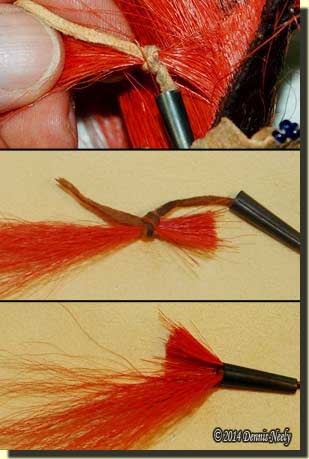
With all of the fringes cut and tapered, I started threading distressed tin cones on each thong of one end. I next took a red-dyed deer tail, selected a tuft of hair and tied the thong around the tuft with a simple overhand knot, about three-eighths of an inch from the hair roots. After the scissors snipped the hair tuft from the tail, I pulled on the thong while holding the tin cone. The hair tuft folded over and the knot and fold slid inside the cone. Like the originals, the tuft’s cut ends and the thong’s tail remain exposed outside the cone’s large end.
When the deer-hair cones were finished on both ends, I folded the pouch over and laid it on a deer hide. Normally, I would have worked bear grease into the buckskin with a fair amount of dirt on my hands to dampen the “just made look,” but I held off on that step. I set the split pouch aside for the moment while I considered all of my options.
Try making a split pouch, be safe and may God bless you.