An Expression of Individuality
Like the powder horn itself, the horn’s strap expresses the individuality of its owner. The casual observer at any living history gathering will be hard pressed to find two identical straps, let alone similar ones.
From the beginning, the bison horn was a stopgap choice, a bridge between a powder horn that “belonged to someone else” and a future re-creation of a native captive’s wilderness treasure. Reworking the stopgap horn pushed its supposed provenance back two centuries, whittling a hickory stopper contributed, too. The next task was to fabricate a suitable strap that added authenticity to the bison horn’s impression.
Neither John Tanner nor Jonathan Alder make mention of their horn straps, but that is not surprising, given the nature of their journal content. In researching other returned captive narratives, I find no mention of powder horn straps, either.
The strap suspending Sir John Caldwell’s 1780-era bison powder horn appears to be a gorgeous, re-purposed chevron waist sash, “tightly finger-woven of hard-textured woolen yarns” (Brasser, No. 140, 142). In the photo plate, a width is not given for the sash, but its length is listed as “w/o fringe 91 cm,” or approximately 36 inches.
Painted in the mid-1820s, Peter Rindisbacher’s “Trapping Beaver” shows a bison horn with what appears to be a thin or braided leather strap. The two other Rindisbacher paintings that I referenced, “A Halfcast with his His Wife and Child,” and “Inside a Lodge” both show colored horn straps that suggest a finger-woven strap.
The cost and feasibility of hunting heavy brush with a finger-woven sash, like that on the Caldwell horn, eliminated that possibility from consideration. Besides, if I owned a sash of that quality, I would be wearing it around my waist and making a new strap for the horn, anyway.
However, a narrower finger-woven strap, like the ones in the Rindisbacher paintings, held strong promise. When we display at the various outdoor shows, my wife demonstrates finger-weaving and offered to make a strap. But the next outdoor show was four months away, and until then her spare time was almost nonexistent.
After much thought and consideration, I opted for a buckskin strap, similar to some I have seen on original, early 19th-century horns. As I usually do, I spent time researching this choice, and considered edge-beading the strap, but in the end I settled for plain and simple.
Making the Horn Strap
 For the horn strap, I selected commercial brain-tanned buckskin. This particular hide had been cut straight down the back from nosed to tail, which would provide a thick strap—thick for deerskin, but not as thick as 3 – 4 ounce cowhide.
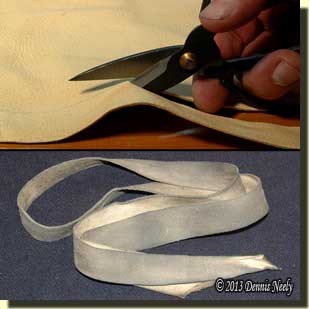
I laid the hide out on the work table and inspected the straight edge for flaws that might affect the finished strap. Finding none, I measured and marked a 1 ¼-inch guide line. The added width allowed for some stretch; I wanted the finished width to be about an inch. Using a medium-sized pair of scissors, I cut along the line. I tugged on the strap and was pleased with the resistance; the resulting length was 43 inches.
Many of the existing deerskin artifacts from the late 18th-century attributed to the Ojibwa, Odawa and Pottawatomi in the Great Lakes region are described as being “black-dyed tanned skin,” the color achieved by black walnut hull dye, or at least that’s the speculation. With that in mind, the strap spent a few days in a walnut dye bath that I keep in a plastic pail.
 As is my usual practice, I stirred the dye bath twice a day to try to get a uniform color. Even then, the leather displays a couple of mottled spots, which is typical of natural materials. When the color was darker than I wanted, I removed the strap, knowing most dyed leather will dry lighter. After rinsing thoroughly with clean water, I gently patted the strap with an old washcloth and laid it out to dry in the shade.
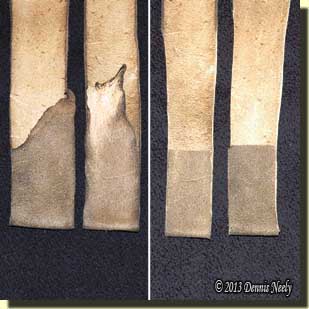
After squaring the strap’s ends and trimming away the hide’s unusable thin edge, I folded the deerskin over itself about 1 ½ inches, right sides out, to begin reinforcing the point of attachment. The folded ends looked too wide, so I tapered the last three inches down to 7/8 inch.
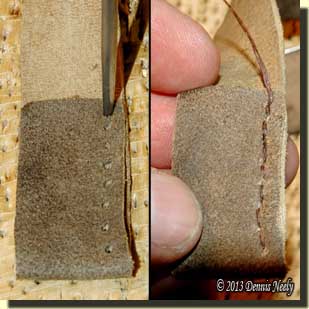 Using my awl, I started punching holes around the perimeter of the reinforcing fold, spaced about 1/8-inch apart, 1/8-inch from the edge. I always use a cottonwood board beneath the leather so the awl’s point doesn’t damage a table top, or worse, my thighs.
For the stitching, I used three plies of waxed linen thread and began a basic saddle stitch. I started the stitching at one corner of the fold. After stitching all four sides of the fold, the last stitch ended at the point of beginning. I knotted the thread between the buckskin layers, passed the needle through the fold and trimmed off the tail, hiding the thread within the fold.
 In the leather cuttings pile, I found two buckskin strips that were 5/16-inch wide and long enough to attach the horn to the strap. Using the awl, I punched a hole just inside the saddle stitches at the fold. Tapering the end of a thong, I threaded the thong and pulled it through the hole until the ends were even.
Excitement started to build. I secured the bison horn at the staple and neck groove using square knots. The bison horn snuggled up to my ribcage and felt good. I thought about shortening the ties to match the two Rindisbacher paintings, but then I got wondering about how the horn would hang while wearing two heavy shirts in winter. I decided to try it out before I adjusted it further.
The excess tails looked bulky and didn’t match the horn’s graceful lines and appearance. With the scissors, I cut each tail into three thin strands. Safely tucked away in the muzzleloading cabinet was a short hank of red trade beads, about 6/0 in size. I greased the strands with mink oil, tapered the ends to a point and strung five or six beads on each strand, spacing them randomly.

Left: The buckskin strand tied about a bundle of dyed deer tail; Right: As the buckskin strand is pulled, the hair folds as it slips into the cone.
At first I knotted the ends of the beaded strands, but as I walked by the horn hanging over the workbench, I kept feeling something was missing. I went back to my museum photos of pouch straps, and in many cases, the Native Peoples left the fringe hanging, but wrapped it with quills and attached deer-hair cones to the dangling ends.
In a fit of whimsy, I grabbed some distressed tin cones and a section of deer tail I dyed orangish-red to trim off a new split pouch. I untied a knot, threaded on a tin cone and tied off a hank of deer hair. With a gentle tug, the hair slipped inside the cone, leaving the cut end and a bit of the buckskin showing, just as the originals. Immediately I knew I had found the solution, and in a half hour the job was completed. The reworked bison horn had a strap worthy of any native captive.
Give traditional black powder hunting a try, be safe and may God bless you.
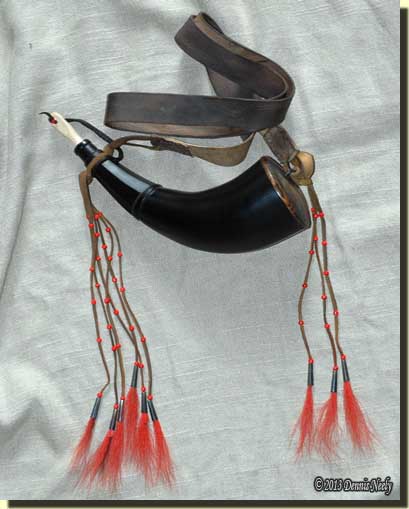
The completed bison powder horn project.
