“Artificially Aging” the Split Pouch
I am not a fan of “artificially aging” a reproduced artifact. Living historians dwell on the importance of “period-correct,” whether that phrase applies to one’s clothing and accoutrements, the physical setting of the simulation or the character impression left by the portrayal.
Perhaps it is by chance, but of late, discussions seem to gravitate to the importance of putting forth “an honest and truthful impression.” I cringe when I hear the word “honest,” especially when it is raised in a conversation about artificial aging; I suppose the circumstance is nothing more than a pet peeve.
But inevitably an individual portraying a longhunter utters that phrase, decked out in an impeccably tailored outfit, artificially aged to replicate centuries-old museum exhibits. That individual’s historical impression mirrors those held up in the various living history media as the epitome of period correctness. Please don’t get me wrong, I do not mean to criticize, only put forth an observation.
Being human, I can’t help but compare my kit to theirs, and most times I walk away feeling guilty that my impression falls pitifully short. As so often happens, days later I find myself sitting against an oak tree deep in the glade evaluating each garment, each accoutrement, comparing them to “the industry standard.”
But traditional black powder hunters are a different breed of living historian. The commitment to authenticity is the same, but a major emphasis is placed on the pursuit of wild game in a period-correct manner. As a result, the wear and tear displayed by a traditional woodsman is different, because it is acquired slogging through a muddy fen or administered with an errant splash in the midst of field-dressing a deer.
Something Old, Something New…
Yet, in the last decade or so I have come to embrace a belief that a traditional woodsman’s material possessions should display a “progression of age and use.” Thus, an honest portrayal should incorporate one, maybe two items that are newly acquired, and dependent on a given persona’s social status and/or occupation, one, maybe two items that are ready for the scrap heap. The remainder of one’s personal possessions should fall somewhere in between, yet all clothing and accoutrements should not display a similar level of trail wear.
When I first embarked on creating a returned native captive persona, I found myself faced with two choices: start immediately by hand-picking existing clothing and accessories that were similar to those used and replace items as I progressed, or wait to begin until the entire persona-correct kit was assembled. As I have said on a number of occasions, I chose the first path.
 I can’t believe it, but I have been working on this persona for almost two years. I have hunted as a returned native captive for one full hunting season, or roughly two-hundred hours afield. Over the two years, I have acquired, made or reworked a ruffled trade shirt, a bison powder horn, a wool breechclout, a pair of blanket leggins, a pair of buckskin leggin garters, and I just completed the split pouch.
Now one might think this constitutes a progression of acquisition/wear, and an argument can be made that it does, from a 21st-century perspective. But the whole point of engaging in a traditional hunt is to relive the past by pursuing wild game in an 18th-century context. John Tanner hunted dawn to dusk, and he implies in his narrative that he wore most of his clothing around the clock, which amounts to 168 hours per week.
Measured by the number of hours spent in my 1790-era Paradise, the ruffled trade shirt, the breechclout and the blanket leggins are nine days old; the bison horn and leggin garters are only a few days old. And therein lurks one of the hidden stumbling blocks of creating any new persona: the majority of clothing and accoutrements assembled are all of the same age, displaying minimal wear and tear.
Adding Trail Wear
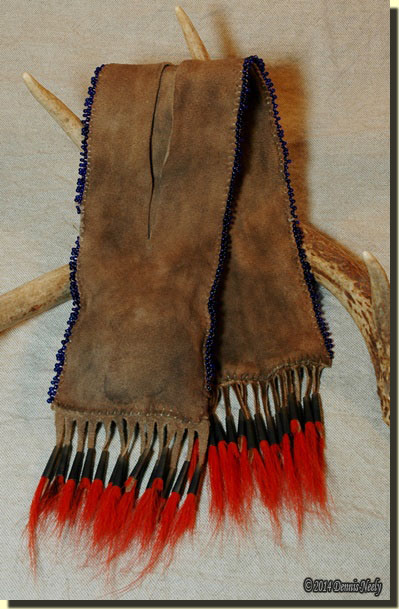
After completing the split pouch based on the Major Andrew Foster example, I folded the pouch over, placed it on a hair-on deer hide and stepped back to admire my handiwork. It was then that I realized it looked “too new.” I saw no alternative but to add a modest amount of trail wear. The only question that remained was “How much is enough?”
As a point of beginning, I spent the next few days thinking through the project, considering the type and degree of distressing, and looking at museum images of Ojibwe and Odawa pouches and bags. It seemed obvious that the wear and tear should put the pouch in the middle of its life, but no more than a year or so old. In the end, I settled on a plan that included three forms of artificial aging that were consistent with my experience and observation: edge bead damage, broken hairs in the deer-hair cones and ground-in dirt.
First: Edge Bead Damage
About twenty years ago I had a pouch with 8/0 beads on the strap. On a deer hunt, I leaned back hard against a shag-bark hickory, then turned quick to my right. I felt something roll, hang up and then release. I was concentrating on an approaching buck, and I didn’t give it any mind. A few days later I discovered that either the bark cut the thread that held the beads or a glass bead broke and cut the strand. I had lost about a dozen beads by the time I made the discovery. The makeshift patch job is still noticeable, and similar to one I recently saw on an Ojibwe bag.
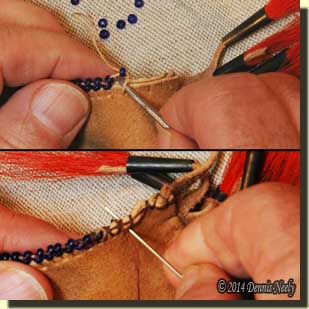
 As I handled the split pouch, I noticed a slack thread in the bottom front corner of the pouch. The point of a sharp awl loosened the thread; a few tugs frayed it a bit. I snipped it with the scissors and began pulling the edge beading apart with the awl until there were ten or so beads lying on the desk next to the pouch.
Since the “damage” was on the joining edge, I dug out a short piece of two-ply brown linen thread and started whip stitching the area. When I came to the last beads, I whip stitched over them so the thread holding them would not pull free. The repair looked “too neat,” so I stitched back to the corner and then worked the thread under the stitching, rather than knotting it.
On the opposite side, up close to where the pouch would fold over my sash, I found another loose strand of artificial sinew. I broke a bead; the idea was to experiment to find out which scenario was most likely the cause of the lost beads on the pouch strap. I fiddled with the exposed loop and noticed some cut fibers. After about three tries, the awl’s point completed the cut, and I again pulled apart the seam, spilling eight or nine beads on the desk.
I postulated that this damaged occurred at a different time, in a different wilderness location. The end of a white linen thread stuck out of the sewing bag, begging to be used. It was 5-ply waxed linen, so I separated out three plies, twisted them back together and pulled them through my bee’s wax block. Again I chose a whip stitch, partly to indicate that the same person made this repair. And again I whip stitched over the loose beads at each end so the cut strand would no longer come undone. This repair was more noticeable than the one at the bottom corner.
Second: “Breaking” Deer Hairs
The red deer hair that once protruded from the tin cones on each end of the Foster pouch is broken and gone, only the tarnished cones remain. A careful examination of deer-hair cones on museum images of other Great Lakes Indian artifacts runs the gamut from fluffy and almost new to gone with the majority displaying about fifty-percent retention. If the split pouch was a year old, I surmised there would be some missing and broken hairs.
I went outside and sat in the sun—I’ve been married long enough to know you don’t want a mess of loose deer hair indoors. At first, I tried to break hairs by pressing the cone on a flat board and twisting in the same manner one would use to put out a cigarette. A hair or two broke, but I determined the process would be too time consuming.
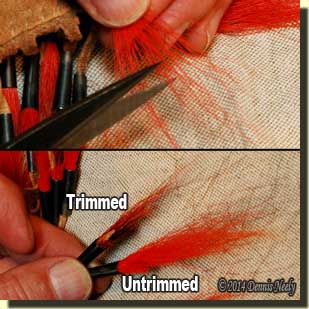
 Next I fanned the hair in the first cone and pinched it tight between my left thumb and forefinger. Using reproduction 18th-century scissors, I clipped hairs, trying not to cut more than one or two at a time or to the same length. I made a conscious effort not to follow any set pattern, but I also attempted to duplicate what I had observed in existing images. It took a few cones before the snipping gained a rhythm, but even then, twenty-eight deer-hair cones took a while.
I tried to limit the distressing so about sixty to seventy-percent of the hair remained intact. I knew I could always cut more, and if I didn’t like the result, I could replace the hair tufts and start over. Some cones looked more ragged than others, which matched the museum photos. When I thought I was done, I went back to the outer cones and clipped a bit more, thinking that they would take the brunt of the field wear.
Third: Ground-in Dirt
I’ve read about all sorts of secret concoctions, trusted recipes and witch’s brews that are sprayed on or rubbed in to imitate “honest” trail wear and years of wilderness aging, which in the end is meant to simulate dirt and grime. Why not just use dirt?
I keep a couple of small bags of dirt on the workbench. One is the equivalent of potting soil, dark in tone and heavy to peat moss. The other I chose for this project is “backyard dirt,” or loamy topsoil.
If I intend to finish an accoutrement with a coating a bear grease or mink oil, I will often rub dirt on my hands before applying the grease. The dirt works into the leather with the grease and takes the edge off the “new luster.”
But for the split pouch I followed a different path. I put about two tablespoons of the backyard dirt in a glass dish, then added a splash of ninety-percent isopropyl alcohol (rubbing alcohol) and a dabble of tap water. I stirred the mud into a cake-batter-like slurry and set it aside. The alcohol evaporates fast, and I think it helps the dirt penetrate the leather fibers better—but that may be wishful thinking on my part, too.
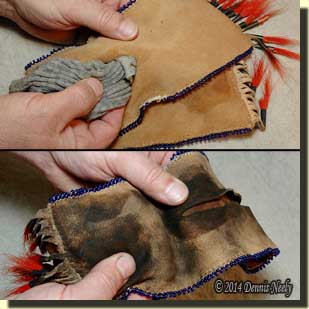
 Turning my attention to the pouch, I cut an old athletic sock in half, got it dripping wet and tucked it into one end of the pouch, shaping it to simulate a wad of tinder. I did the same for the other end. I wet my hands and handled the pouch, but not to the point it was soaking wet.
Next, I dipped about a half-teaspoon of muddy slurry from the bowl with my fingers and rubbed it into both hands. I started handling the pouch as if I was using it. My hands got cleaner and the pouch got dirtier. I added more mud to my hands, then pushed my fingers in and out of the cut opening. I worked the split’s exposed edges between my thumb and fingers then handled the ends, kneading the bulged area that concealed the sock.
I added tap water to the remaining slurry, sloshed it around and tossed it out in the yard. Then I mixed up a slurry of the potting soil in the same manner as before, dabbed it on my hands and handled the pouch. When I was done, I hung the pouch out in the shade and let it air dry. The sock area stayed wet, so at the end of the day I carefully pulled the socks out and hung the split pouch over the workbench.
The next day the dry pouch felt gritty and looked blotchy and puckered, but I expected that. I drew some tap water in a brass kettle and rinsed the pouch. I gently squeezed out the water, taking care not to wring it out for fear of distorting the pouch’s shape. Again I hung it out for the day. Part of the dirt’s discoloration washed out, but at the same time, the blotches blended together somewhat.
For now, I softened the stiff pouch. Instead of greasing it, I think I will wait on that. Having very limited experience with a split pouch, my intention is to wear it, use it and learn from it in the wilderness classroom.
Keep mindful of 18th-century days, be safe and may God bless you.

