
The Basic Stitches
Newcomers to hand sewing are often surprised at the number of different stitches and a bit perplexed by the properties of each. The best place to start is with the basic stitches: the running stitch, the whip stitch, the back stitch and the saddle stitch.
Running Stitch
The running stitch is a fast and easy stitch used in fabric and some leather applications. The seam has moderate strength, but in high stress/strain areas, the running stitch tends to require additional attention over time and sometimes fails.
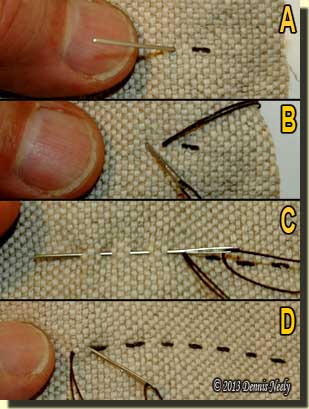 To make a running stitch for a hidden seam, place the right sides of the fabric together. Anchor the thread at the chosen seam allowance. Close to the anchor point, push the needle through both layers of fabric and pull the thread through; assuming the thread is anchored to the bottom layer of fabric, the needle passes through both layers, from bottom to top (Fig. A). Count four or five threads in the top layer weave in the direction you want the seam to go and push the needle back through both layers, from top to bottom (Fig. B). Pull the thread snug making sure both strands have no “stray loops.” The first stitch is complete. Count four threads on the bottom layer of fabric and continue the stitch sequence.
The needle “runs” back and forth through the fabric, first passing from one fabric face to the second, from the second back to the first and from the first to the second. With experience, the needle’s point can run back and forth through both layers, assuming the fabric is soft and pliable, accumulating several stitches on the needle before the thread is pulled through (Fig. C). This speeds the stitching. Following a thread line in the weave helps maintain the seam allowance.
Care must be taken to keep the thread snug without “gathering,” or bunching up, the fabric, a result of pulling the thread too tight, thus shortening the seam’s finished length. When using a running stitch, I prefer to pause every two or three inches and create a lock stitch by bringing the needle through the last hole, in this case, from bottom to top and then top to bottom, which loops the thread over, or duplicates, the last stitch, thus preventing accidental puckering or gathering (Fig. D).
Whip Stitch
Another fast and easy way to connect layers of linen or leather is the whip stitch. It should be noted that the whip stitch is sometimes called the overhand stitch. Different re-enacting groups, regional areas or instructors use the terms interchangeably, but in truth, the whip stitch and the overhand stitch are different stitches. With the whip stitch, the needle passes straight through the material and the finished stitch is diagonal; and with the overhand stitch, the needle passes through the material on the diagonal and the finished stitch is straight. The true overhand stitch is a variation of the whip stitch and is often used to attach lace or ribbon.
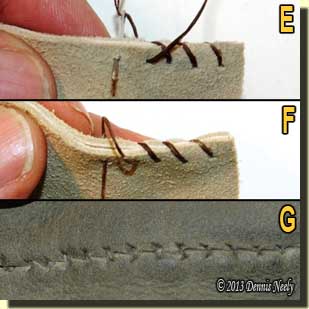 In leather, a single stranded thread is most often used, and pre-punched holes are usually necessary. The thread is anchored, the needle passed from right to left or back to front, depending on the worker’s perspective, and the thread is snugged tight (Fig. E). The needle is brought back over the seam allowance to the right or back side. The needle then passes straight through the next hole, back to front and the thread is again pulled tight. The resulting stitch crosses over the seam allowance at a diagonal (Fig. F).
The whip stitch is common in leatherwork and is usually intended to go unseen. The seam begins with right sides together. When turned right side out, the stitching is visible, and the stitches appear small and straight (Fig. G). To hide the seam or protect the stitching, a welt is often added.
 For each stitch, the needle returns to the starting side, “whipping” over the seam. As a reminder, newcomers are often instructed to repeat “back to front” as they stitch, or until such time as the whip stitch becomes an accepted habit.
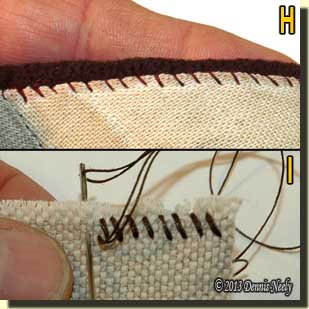
In fabric, the whip stitch is used where a hidden stitch is not possible, such as closing the seam after a lined weskit is turned right side out (Fig. H). To prevent unraveling, a whip stitch is sometimes used to overcast a seam allowance (Fig. I). One or both seam allowances can be overcast. The weave of the fabric and the potential for fraying determine the spacing of the whip stitches, which are executed in the same manner as with leather.
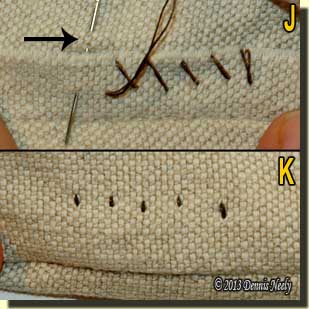 In some patterns, a modified whip stitch anchors the seam allowances raw edge to the garment’s material field. The seam allowance is pressed open, meaning the right-hand seam allowance is pressed flat against the right-hand material field and the left-hand seam allowance against the left-hand fabric. The thread is anchored midway in the seam allowance, the needle “grabs” two or three threads (moved up at the arrow for better clarity) from the material field coming straight down toward the seam allowance and the needle is passed under the seam allowance and out at the midway line (Fig. J). Only a straight stitch is visible on the outside of the garment (Fig. K), but on the seam side, the stitches angle, holding the seam allowance tight against the material field.
Back Stitch
The back stitch is the primary stitch used in cloth garment construction. Properly made, the top-side stitching looks like a sewing machine stitch while the bottom-side stitches overlap with a slight angle. Back stitching can be either visible or hidden.
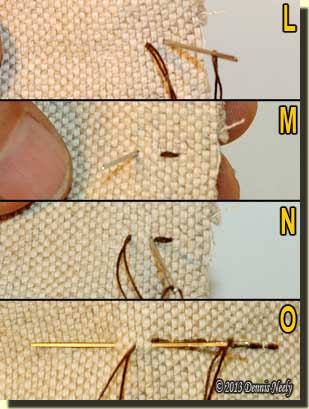 With right sides together for a hidden seam, begin the back stitch by anchoring the thread, single or double strand, to the bottom fabric layer. Count four threads ahead of the anchor point and pass the needle through all layers, bottom to top. Snug the thread, count back four threads and pass the needle through all layers (coming out at the anchor point), top to bottom (Fig. L). Snug the thread to complete the first stitch on the top surface.
Now count four threads ahead of where the needle passed bottom to top on the last stitch (eight threads ahead of the anchor point). Pass the needle through all layers, bottom to top and snug (Fig. M). Bring the needle point back to where the first stitch emerged, pass it top to bottom, snug the thread and continue sewing (Fig. N). The top stitches should form a straight line and be a uniform four threads long; the bottom-side stitches should angle past each other and be eight threads long. With practice, a back stitch can be completed with a single needle pass (Fig. O).
Saddle Stitch
The saddle stitch is primarily used in leather work, for strength, durability and eye appeal. Two needles are used, one at each end of a single strand of thread. The stitching might be hidden or visible.
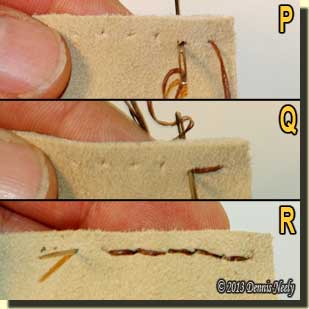 To join two pieces of deerskin, for example, with the saddle stitch, pass one needle through the first pre-punched hole, top to bottom. Draw the thread through the hole until there is an equal amount on each side. Pass the top-side needle through the next hole, top to bottom (Fig. P), then work the bottom-side needle through the same hole, bottom to top (Fig. Q). Apply equal pressure to both ends of the thread and snug the first stitch. Continue the double needle stitching until the seam is completed.
The layers are sometimes held firm in a leather-workers vice, which frees both hands and speeds the stitching process. Since I rarely use a vice, I prefer to hold the work in my left hand and alternate the needles using my right hand (Fig. R). To end the seam, the thread can be tied off or stitched back. To stitch back, reverse the direction of the saddle stitches, stitching over the last few stitches. To secure the thread ends, work each needle through one layer of leather, out through the edge, pull the thread tight and cut it.
Running Stitch with Return
 An alternate method to the saddle stitch is a running stitch with a return running stitch added. Many re-enactors use this stitch for leather or fabric, but I have never seen it named. For lack of a better name, I just call it a “running stitch with return.”
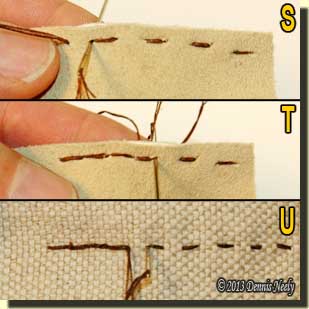
Sew a running stitch for a given length, either pre-determined or random, then reverse the stitch direction. Assuming the needle is on the top side, pass it through the next to last hole, top to bottom (Fig. S). The resulting stitch leaves a surface thread that connects to the last top-surface stitch. On the bottom side, slip the needle through the next hole, bottom to top (Fig. T), creating a bottom surface stitch that duplicates the look of the saddle stitch.
I sometimes use the running stitch with return in fabric (Fig. U), either where both the top and bottom seam will be visible, like the neck gusset, or because it is faster to stitch, especially through several fabric layers. The return run of stitches increases the seam strength and durability while giving the neat appearance of the two-needle saddle stitch.
Give hand-sewing a try, be safe and may God bless you.
