Necessary Wilderness Lessons
Eighteenth-century, hands-on education requires patience. Knowledge gained spans many wilderness classroom sessions, sometimes scattered over many years. A tiny discovery…further testing…another tidbit gained…a few more white-tailed deer hunts…an additional revelation…an entire wild turkey season worth of chases…
 The wilderness classroom offers unlimited opportunities to perfect the secrets hidden within a scant sentence in a hunter hero’s memoirs. The use of a portage collar to bind a rolled wool trade blanket represents a prime example of learning by doing spread over many years. On the surface, bundling a four-point blanket and binding it with the collar’s leather tails appears simple.
But track a fine buck across a treacherous swamp and have a jagged sumac branch catch a few leather loops and jerk them free…
Or follow the hounds baying after an old male bobcat in a cedar thicket and have knots loosen and the bedroll settle down the back…
Yet, each failure, and there have been a lot of them, moves the living historian another step closer to a deeper understanding of what an 18th-century simple pursuit was really like.
Rolling the Trade Blanket
Over the course of a Michigan hunting season, I rely on at least three different wool blankets, because of temperature fluctuations: a dark-red common blanket for early fall, a four-point scarlet blanket for below freezing and a four-point white blanket for hunting in the snow.
All three blankets are roughly the same dimensions. I begin by folding the blanket in half lengthwise, then fold it in thirds widthwise and roll it from the center fold to the edges, which keeps the blanket tight and prevents wrinkling or bunching up as it is rolled.
If I use the same folding and rolling process, the bedrolls end up about the same length: 24 inches, based on the tri-folded width. Because the weaves/wool naps vary, the thickness of each blanket produces a different rolled diameter. Likewise, if I tuck an extra shirt or moccasins in the blanket before folding and rolling, that makes the finished roll thicker yet, and in either case, requires additional tail length.
The rolled width is relative to the individual living historian’s personal practices and preferences, again developed through hands-on laboratory experimentation in the wilderness classroom. Over the years, I have folded my blankets in different manners, sometimes resulting in a bedroll that is wider, sometimes narrower.
A person’s body/shoulder width can become a factor, too. A broad shouldered person will not be comfortable with a bedroll that is 18 inches wide, just as a petite-framed lady may be dissatisfied with a bedroll that is 36 inches wide.
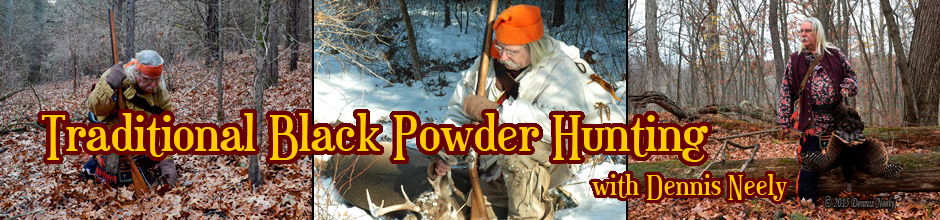
In the early years, three decades ago, I started using my bound bedroll as a cushion. I found it quite uncomfortable to take a stand against a tree with the bundle still slung over my shoulders, hanging snug in the center of my back. One cold afternoon I cleared the leaves away, centered the bedroll in the middle of the nest and sat down upon it. The frost was in the ground for that hunt, which some years is anytime from the end of October on. About ten minutes later, I felt my own body heat begin to radiate up into my hips from the wool fibers. I’ve sat on my bedroll ever since.
Binding a Rolled Wool Trade Blanket
My current method for binding a bedroll with a portage collar is the same, regardless of which blanket I use. I like to have the bedroll fit snug against my back and not slip or slide around as I walk or stalk through the glade. Sometimes I sling the brow band over my right shoulder and under my left arm, because I am right-handed. On other occasions I allow the strap to ride high on both shoulders, running across the center of my chest. Therefore, the first consideration is determining how long the brow band needs to be, and I find the same length works for both carry methods.
 My research does not find tape measures listed among common trade goods of the North West Company, so I am left to seek other means of measuring. I like to find the center of the brow band, place it at my elbow and then grasp the leather tail at the tip of my extended fingers, in my case a distance of 17 inches.
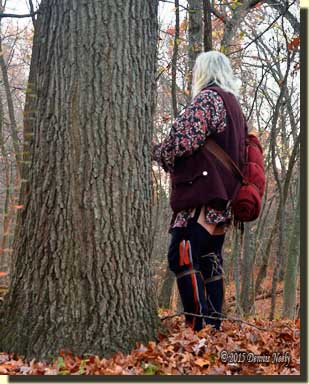
With the rolled blanket in front of me, positioned long ways left to right, I hold that point between my left thumb and index finger, and press it against the right side of the blanket about four finger-widths from the edge. Taking my right hand, I wrap the collar’s leather tail around the blanket twice and pull the tail tight, compressing the blanket. This is where I want to tie the strap firm.
I next slide the loose tail under the strap and the two wraps from the inner side of the wraps to the outside. I pull the excess tail through, then I lay the tail over the straps at an angle to the straps. I again push the tail under the straps, inside to out and take up the slack. With the half-formed knot held tight against the straps, I tuck the tail’s end under the angled over-hand wrap and pull it through, creating a clove hitch over the two binding straps. I pull the clove hitch tight. Note that there should be about two wraps worth of tail leather left.
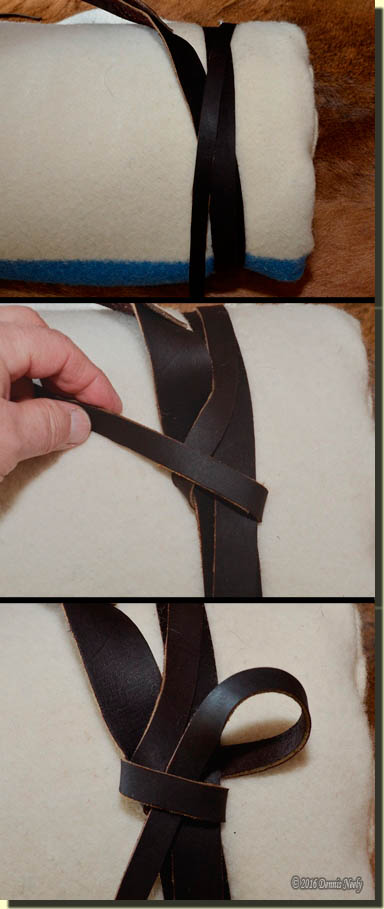
I repeat the process and bind the left side of the blanket using the same two wraps and the clove hitch. Once secured, the blanket roll can be “tried on.” If the brow band is too snug or too loose, the clove hitch can be moved to make adjustments. Keep in mind that the portage collar will stretch a bit with normal woodland motion, especially if the portage collar is new and the leather is still stiff.
Also, if the straps are not tied tight enough, they will tend to move to the outside and may even slip off the rolled blanket. Trial and error is the best teacher for determining how tight to cinch the binding straps. A simple half-hitch or even a square knot loosens quick with a hunter’s gait. The clove hitch is the only knot that I have found that holds firm and steady before, during and after the chase.
 With the brow band adjusted, I next pull the loose tails to the center of the bedroll, loop them around each other and wrap them around the rolled blanket. On the far side, I tie the tails with a square knot. This single wrap binds the center of the blanket and also keeps the two outer wraps from working free and coming off of the bedroll. Experience, again…
When I bind up a blanket, I like to orient the clove hitches on the side opposite the open edges of the blanket. This point of suspension allows the blanket to ride with those edges down where they will not collect water, snow or forest debris.
In the early years, it was not uncommon to stop and adjust the portage collar and/or the bedroll. On the one hand, such stops might seem like a nuisance, but in truth they were necessary wilderness lessons in the search for an 18th-century education based on firsthand experience in the long ago.
Bind up your bedroll and step through time’s portal, be safe and may God bless you.
