From Buckskin to Buffalo Hide
Any look at 18th-century material culture, especially as it applies to traditional black powder hunting, usually includes personal items made from leather or rawhide. Moccasins, sometimes leggins and a multitude of bags, pouches and straps were handmade from leather, to say nothing of the smaller, everyday accoutrements associated with any living history characterization.
Again, the big questions is “buy or make,” but for most traditional hunters the answer falls somewhere in between. Reputable artisans can supply any need, especially when a copy of an existing museum artifact is desired. The governing factors usually include cost, visibility and personal skill level.
For the first-time leather worker, smaller projects such as a buckskin pouch to hold one’s fire starting supplies or a flint wallet represent an appropriate starting point. The idea is to gain experience and skill while creating a useful artifact that moves the authenticity of the traditional hunt forward.
Some Thoughts on Working with Leather
Like fabric, the various types of leather also possess different characteristics, either due to tanning method, nature of the fibers or animal species the hide came from. Again, it is best to research the specifics of a given leather type before beginning any project.
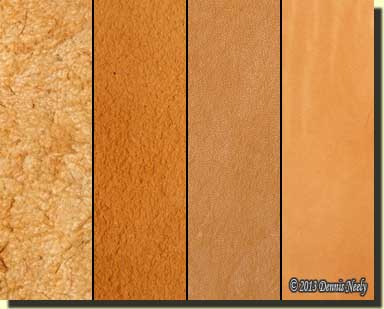
Different leather types (l to r): Brain tanned and commercial tanned deerskin, commercial tanned cowhide and vegetable tanned horsehide,
The tanning method—natural or brain-tan, bark, vegetable or commercial tan—affects not only the period-correctness of the finished article, but also the workability of the leather during the construction process. In addition, the tanning method sometimes affects the durability of the accoutrement or garment, either extending or decreasing the usable life relative to the original artifact.
Leather is sold by a variety of measures: by weight, by the square foot, by hide quality or by a combination thereof. It seems every seller uses a slightly different system. The best advice is to find a reputable seller, stick with that vendor and whenever possible, always examine what you are about to purchase.
For example, when purchasing a “3 – 4 oz. vegetable-tanned cowhide” one seller states the hide should weigh between 3 and 4 ounces per square foot while another equates one ounce to 1/64 of an inch, so their 3 – 4 oz. vegetable-tanned cowhide is actually sold with an average thickness of 3/64 to 1/16 inch. In both cases the hide is priced by the square foot, but the purchaser must take a whole hide, or portion of a hide (half, belly, back, side, double shoulder, etc.) as it comes from the tannery.
As with period-correct fabrics, newcomers often opt for commercial-tanned buckskin because of its cost. Brain-tanned buckskin can run two to three times more per square foot than commercial-tanned buckskin. An alternative is “commercial brain-tan,” which has the look and feel of a natural-tanned hide prior to smoking. But as authenticity becomes more important, traditional hunters gravitate to reproducing an artifact with the same type of leather used in the original, regardless of cost or physical effort.
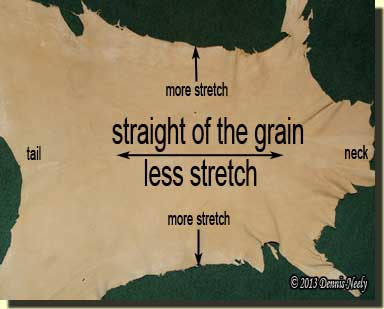 The leather’s thickness varies within the hide, being thicker along the center of the back and in the neck area than near the belly or flanks. Like fabric, leather has a grain with respect to strength and stretch, which runs from the animal’s head to the tail. The leather is strongest along this line and stretches less than from back to belly. The straight of the grain is especially important when constructing leather garments. On some hides the effect of a bias cut results in unwanted stretching and distortion, just as with fabric, thus the orientation of a moccasin along the straight of the grain is crucial to a comfortable fit and satisfactory woodland service.
A fresh-skinned hide has a second type of “grain.” The outermost protective layer of the skin is called the epidermis (sometimes referred to as the grain in error) and just below the epidermis is the papillary layer, or “grain.” If this skin layer is left prior to tanning, the finished leather will have a smooth, shiny surface on the outside.
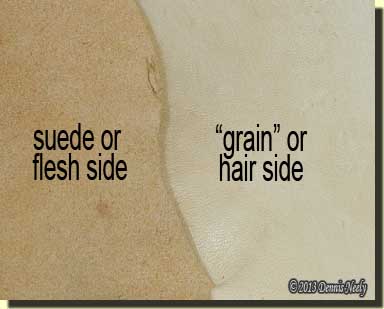 Leather can also have a right side and a wrong side, but which is considered the right side, or the side intended to be seen, can depend on a number of factors: the original artifact, the time period, accepted practice in that era or locale and the type of tanning used on the leather chosen to re-create the item.
In the case of tanned leather with a smooth grain side and a suede, or muscle side, the right side for a given project might be the suede side. For natural-tanned leather, the outside and inside look similar, and the difference is harder to discern, thus care must be exercised to make sure the viewed side of the buckskin is always the same. Again, what constitutes the right side is determined by the person reproducing the accoutrement.
Give hand-sewing a try, be safe and may God bless you.
