
Sifting Through Choices
In the early 1790s, Major Andrew Foster, a British officer in the Lower Great Lakes region, acquired a single leggin garter, or that is all that survived from the original pair. As I researched a suitable garter to use as a “period-correct” example for the new returned captive persona, I found myself returning to the catalog page that displayed Major Foster’s prize. That garter was more ornate and elegant than what I thought a returned captive might own, but for me there was an unmistakable magnetism that surrounded that artifact.
A six row panel of quillwork is beyond my skill level, plus I do not wish to be worrying about losing or damaging a quilled garter in the midst of a wild turkey chase. Because of differing game regulations from state to state, I make it a point not to include any game parts in my clothing or accoutrements, which eliminated the hanging feather cluster. A horse hair pendent does not excite me, either. All that remained are the deerskin backer, the pale-blue beads and the deer-hair cones.
The next decision was determining workable dimensions. I donned a buckskin leggin and grabbed my sewing tape (some sewing tapes will stretch, so snug the tape, don’t pull it tight); the circumference of my leg below the knee and above the calf is 15 inches. One of my future projects is wool leggins similar to those Sir John Caldwell owned, so with that in mind, I wrapped my leg with the wool I purchased for that project. The resulting dimension was 14 inches.
For me, four fingers measures about 3 inches, which seemed a bit wide, given I intended these garters to be plain and simple. I vacillated between 2 inches and 1 1/2 inch, but before I made up my mind, I found a strip of commercial brain-tanned deerskin that was 1 3/8 inches wide and 27 inches long. I also located four buckskin thongs about 22 inches long for ties.
Making Buckskin Leggin Garters
The vague museum description for the Foster garter stated it was “dyed,” but did not elaborate. Many surviving Native American artifacts are presumed dyed in a walnut-hull dye bath. Very little deerskin was visible in the photo, but what I did see looked a lot like the results I get from a few day’s immersion in a walnut dye pot, so the leather pieces went in.
 I stirred the pot twice a day, rinsed the leather and worked out the excess dye with my thumb and forefinger. After drying in the shade, I set the thongs aside and concentrated on the deerskin strip. I trimmed off the unusable end material and found I could get two pieces a little over 13 inches long with a final width of 1 1/4 inch.
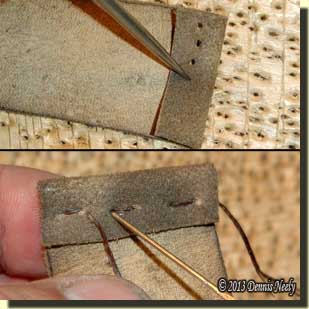
Deerskin is thin, and I feared the tie thongs might pull out with hard use. I folded over the ends about 3/8 inch, right sides out, and punched a half-dozen holes for a single stitch line. After separating and waxing two plies of dark linen thread, I used a running stitch with a return to secure the fold, tied it off between the deerskin layers with a square knot and hid the thread within the fold.
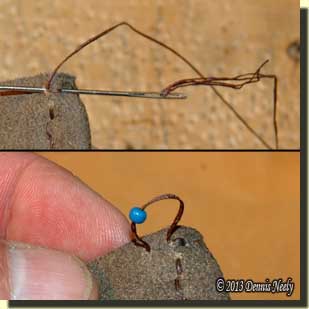 A longer single strand of waxed, two-ply linen thread was anchored at the last hole in the stitch line. With the awl and a cottonwood backer board, I punched about ten small holes, the start of the beading line, about an 1/8-inch apart and 3/32-inch from the garter’s edge. With the thread on the garter tie’s finished side, I strung one medium-blue 8/0 bead on the thread (without a needle on the thread), then passed the bare thread through the first hole. On the back side, I used the awl to open up the next hole, then passed the thread back to the finished side. With another bead strung, the running stitch continued.
The result was a line of blue beads close to the garter’s edge, one per visual stitch, spaced 1/4 inch apart. With the linen thread tied off at the last stitch, I turned the garter end for end, anchored a new thread and duplicated the line of stitching along the opposite edge.
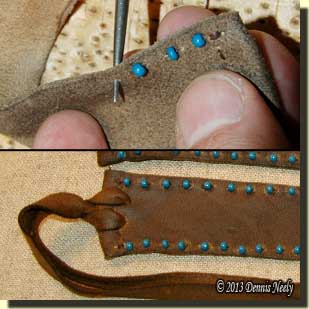 Turning my attention to the tie thongs, I punched two holes in the end of a garter, 3/8 inch apart and just beyond the sewn folded edge. I tapered the ends of a thong, threaded them through the holes, fed them through the resulting loop and snugged the thong up so the resulting cinch knot gripped the garter’s reinforced end. I repeated the process until all four ends had a tie thong attached.
Once completed, I worked bear grease into the garter with dirty hands. I keep a small bag of loamy topsoil on the work bench for this final step. I find “dirty grease” tends to take the “just made luster” off of any leather object, as well as other accoutrements, adding subtle highlights and tones—in essence the first layer of wear and tear.
At this point in the project, I decided not to add the deer-hair cones. I have concerns about how well they will hold up in the swamp grass and brambles, plus, when not still-hunting, I prefer to sit cross-legged on my blanket roll, which will grind the deer-hair cones into the soil. Yet, on the other hand, that is what the wilderness classroom is for—hands on, trial and error experimentation. And after all, the deer hair cones can be added in the future. Who knows, these leggin garters may be only “temporary,” anyway.
Make a new pair of leggin garters, be safe and may God bless you.
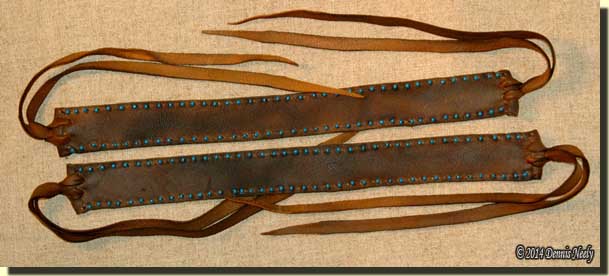
The completed leggin garters.
