Maximizing Safety, Minimizing Impact
Serious accidental injuries dot 18th-century hunting narratives. One moment, John Tanner, a favorite hunter hero of mine, tells of his woodland prowess:
“…All the hunters of this band [‘Red River Ojibbeways’] had been for some days trying to kill an old buck moose, who had become notorious among them for his shyness and cunning…It so happened, that the weather and wind were favourable, and I killed the buck moose…I was thenceforth reckoned the best hunter in that band.” (Tanner, 150)
Two paragraphs later, misfortune befalls Tanner as the twelve-member band of Ojibwe hunters pursued beaver in Sioux country:
“I had wounded myself by accident in my ankle bone with a tomahawk, and became in consequence unable to travel fast. About this time my companions became panic struck, supposing the Sioux to be near us and on our trail. They paid not the least regard to my situation, but fled with all the speed they could make…” (Ibid, 151)
James Smith’s story of a large cane splinter in his foot is yet another example:
“…I got a cane stab in my foot, which occasioned my leg to swell and I suffered much pain. I was now in a doleful situation—far from any human species, excepting black Jamie, or the savages, and I knew not when I might meet with them—my case appeared desperate…” (Smith, 128)
With the help of Jamie, Smith removed the splinter with the “surgical instruments” he had with him: “a knife, a mockason awl, and a pair of bullit moulds.” (Ibid)
And, as mentioned in the introduction to this tutorial, Alexander Henry related the story of a Native American hunter who fell on the ice and severed his hand with the bare blade of the tomahawk tucked in his belt.
Mix smooth-soled, center-seamed moccasins with frost, snow, ice or dew-laden grass and an abrupt and perhaps catastrophic fall becomes a real possibility for any traditional black powder hunter, regardless of age or physical condition. Add in a quick twisting of the body as a fine stag approaches, not paying attention to where one’s hands are in the midst of an intense stalk or the overturning of a canoe and the probability of injury increases many fold—but such are the risks associated with this glorious living history pastime.
Safety should be the foremost issue when undertaking any traditional hunt. Balancing the need for an honest portrayal based on primary documentation with the need for engaging in a safe pursuit requires a dash of measured compromise. In essence, the living historian must measure the risk of any modern intrusion (in this case, a period-correct probability of injury) and seek a compromise that addresses that risk while having a minimal impact on the overall time traveling experience.
With that in mind, I settled on making a bit guard for the Long Lake ax.
Making an Ax Bit Guard
Bit guards are somewhat common among those individuals who frequent the rendezvous circuit. The premise is simple: make a small envelope that fits over the ax’s bit and devise a means of holding it in place when the ‘hawk is tucked in a belt or sash.
As a traditional black powder hunter, I wanted a bit guard that would stay in place in the toughest of brush, be small enough to go “almost unnoticed” and not have a negative impact on the overall historical impression.
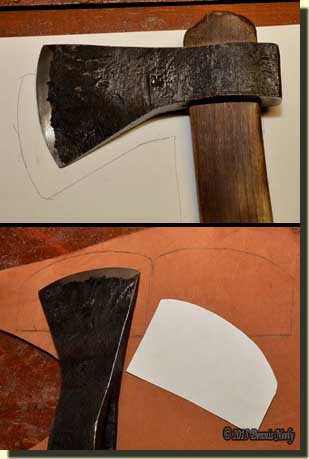 The planning stage began by tracing the Long Lake ax’s profile on a cutting of 67-pound white card stock. Leather sheaths for sharp-edged tools and accoutrements require the addition of a welt, or narrow, extra layer of leather that covers and protects the stitching from accidental cutting.
To allow for the welting, I penciled a second line, adding 3/8-inch to the top, bit and bottom edge of the tracing. Two-inches back toward the eye I drew a vertical line and cut out the pattern.
In hindsight, I should have compared the pattern to the Hudson Bay Company tomahawk reproduction that I sometimes use before cutting the leather. The bit on the HBC ‘hawk is only 3/16-inch larger than the Long Lake ax; the added length would have made no difference, and the finished bit guard would have fit both axes–another “lesson learned” in the wilderness classroom.
Grabbing a cut piece of cowhide, I traced the pattern on the grain, or smooth, side of the leather, then flipped the pattern to create a right and left side. After tracing a third image, I drew in the 3/8-inch width of the welt and began cutting out the two sides and the welt.
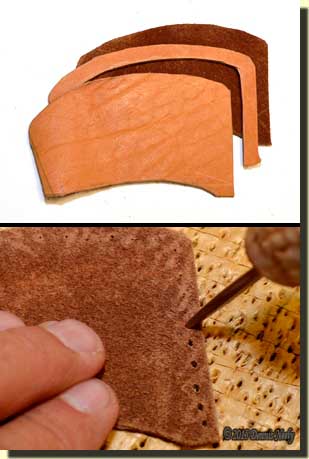 With the two sides and the welt clamped together, the ax head was slipped into the guard to test the fit. Playing with the head and bit cover revealed that the bottom edge could be angled up some to minimize material and “slim down” the look. Scissors cut a gentle curve in the edge toward the eye, easing the harshness of the straight line.
Using a moccasin awl, I punched holes in the welt, spacing them about 1/4-inch apart. Using the welt as a template, I punched holes in the smooth face of both sides. Because the leather was very stiff, I turned the sides over and opened the holes with the awl.
With all the holes punched, the stitching began. I threaded two #18 tapestry needles, one at each end, on a 30-inch length of artificial sinew. I chose artificial sinew over linen thread, because i wanted maximum strength and durability. I realize the linen thread is the better choice from an historical perspective, but the bit cover is not a documented artifact, rather an article of personal safety.
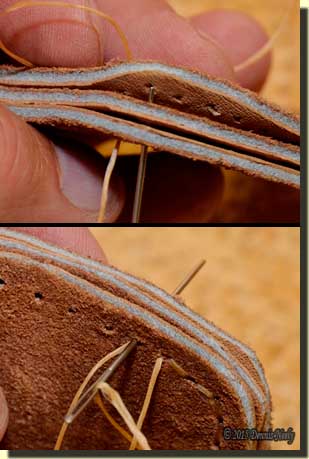 Wanting the rough, or muscle, side out, I pinched the smooth sides together with the welt in between. The first needle passed through the near side, the welt and then the far side at the first hole. With the sinew divided equally on each side of the cover, the first needle passed through the second hole on the far side, the welt and the near side. Taking the second needle, I guided it through the second hole (the same hole the first needle just passed through) from the near side to the far side, and then pulled the first stitch tight.
For longer length seams, I like to add a series of single, temporary stitches, tied with a square knot, every few inches to hold the parts together while stitching, but the size of this project and the stiffness of the leather made that impractical. In addition, I found myself “opening the leather layers” to make it easier to run the needles through the punched holes.
Saddle stitching eats up a lot of thread fast. When I ran out of sinew, I took one stitch backwards and ran the blunt needle point out the inside edge of the near side before the needle passed through the welt. Taking a back stitch on the far side, I brought the needle through the far side, the welt and then out. With both ends of the sinew at the near side of the welt, I tied a square knot. Pushing the needles between the near side of the welt and inside of the near side, I pulled the remaining sinew ends inside the sheath and clipped them off. I then started again in the last hole stitched through and continued on.
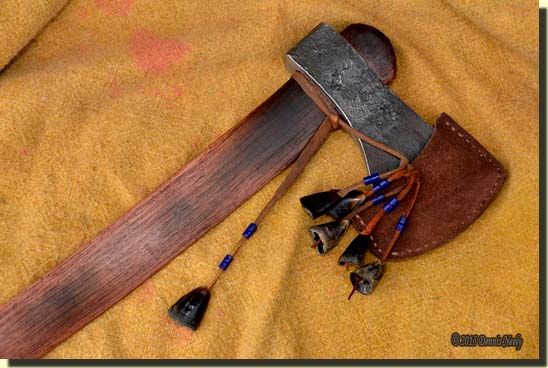
The cover fit tight on the Long Lake ax’s bit, but it needed something to secure it during a rough chase. A single length of buckskin, long enough to wrap around the haft was a logical solution. A few deerskin thongs always hang near the work bench. An 18-inch length seemed about right, secured in a modest hole punched in the eye-edge of the guard.
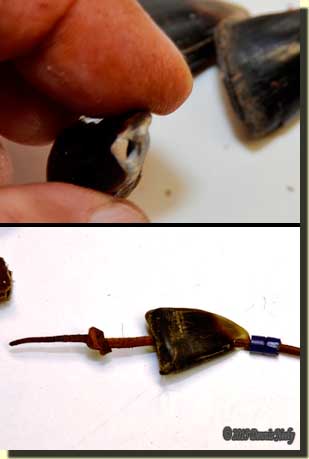 But the thong detracted from the overall impression, which was not acceptable. Sometimes the best way to hide an imperfection is to accentuate it. After much thought, a bag of dew claws found their way to the work bench, along with some antique blue beads. I drilled a hole in the a dew claw, threaded two beads on the end of the thong, inserted the thong through the hole and tied a small knot on the “bell” side of the dew claw. I knew Msko-waagosh would be pleased as I added a dew claw to the thong’s other end.
Two dew claws was a start, but from viewing other period artifacts, a few more looked better. Taking two shorter thongs and threading them through where the long thong tied to the guard, I added four more dew-claw dangles. Five dangles on the guard presented a pleasing appearance without overpowering the guard. I stopped there.
Two coats of neatsfoot oil, worked into both sides of the leather, finished the project. The bit guard is not period-correct, but the “artifact” safely covers/protects the ax’s bit, is small enough to go “almost unnoticed” and I don’t believe it will diminish the overall historical impression. Time will tell…
Give traditional black powder hunting a try, be safe and may God bless you.